
A complete guide for beginners with no coding.
International market. income in dollars.
How to use this guide. Read it in order.
Parts 1–3 help you understand what's going on and how to think about it.
Parts 4–5 are hands-on: you run your first code.
Parts 6–8 turn the skill into money.
At the end there's an FAQ and a glossary (if you hit a word you don't know, look there).

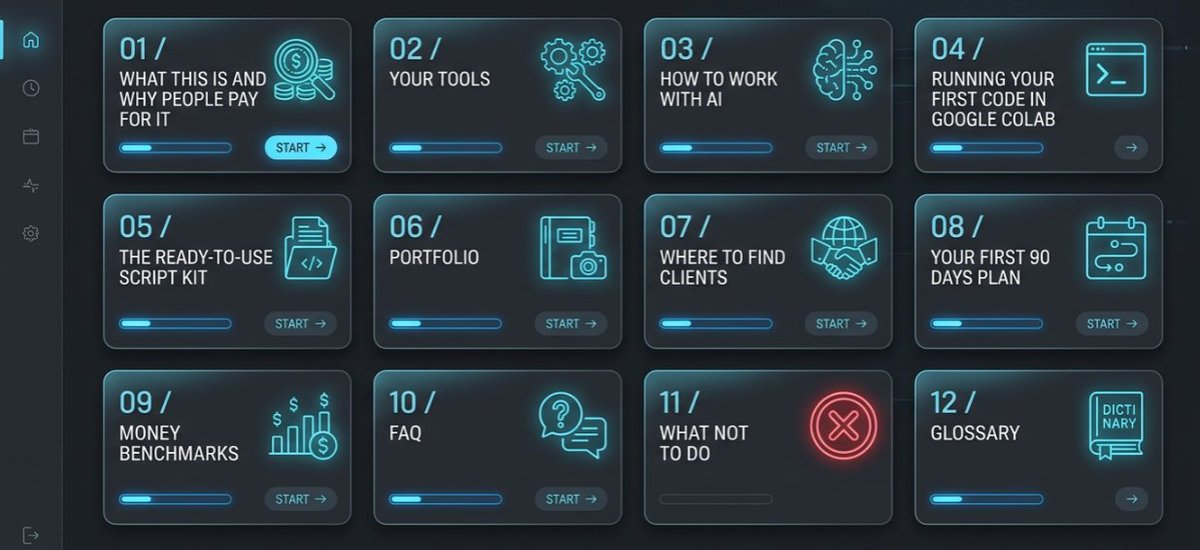
Table of Contents
-
What this is and why people pay for it
-
Your tools -> what they are and why (in plain words)
-
How to work with AI -> your main skill instead of programming
-
Running your first code in Google Colab -> step by step
-
The ready-to-use script kit (with an explanation of what each one does)
-
Portfolio -> three projects that sell
-
Where to find clients and how much to charge (with English templates)
-
Your first 90 days plan
-
Money benchmarks
-
Frequently asked questions (FAQ)
-
What NOT to do
-
Glossary
Part 1. What this is and why people pay for it
Computer vision is technology that lets a computer "look" at a photo or video and understand what's in it: which objects are present, where they are, where they're moving, how many there are. Essentially it's the same thing the human eye and brain do -> only automatically and across any number of cameras at once.
The four videos that started all this aren't toy tutorials -> they're four real commercial tasks:
- Counting objects -> warehouses, inventory, stock control.
- Tracking and counting people/vehicles -> stores (how many came in), roads (how many drove by).
- Speed estimation -> traffic enforcement, road and site safety.
- Sports analytics -> tracking players, breaking down matches (a huge industry).
Businesses pay for things like this constantly: retail, security, road traffic, manufacturing (defect control), agriculture, sports, logistics.

Why can a person with no degree and no programming do this now? Because two things appeared:
- Ready-made tools that already know how to "see" (no need to invent them -> you just run them).
- AI assistants that write and fix code for you.
This used to require an engineer with years of experience. Now your job is to assemble ready-made blocks and explain to the AI what you need.
Honest talk about what will actually work out:
- This path leads best of all to freelancing and turnkey projects -> you build the client a working system (for example, visitor counting) and get paid for the result. This is the main path (Path B below).
- It's harder and slower for full-time engineering jobs at a company: in interviews they'll still ask you to write code live, and AI alone won't cut it. People go there once they have project experience (Path A).
In other words, money comes fastest from clients for finished work, not as an offer from a big corporation.
Part 2. Your tools -> what they are and why
Don't be scared by the names. Here's what all of this is in plain language:
- YOLO -> the "eye." A ready-made model that finds objects in an image and draws a box around them with a label ("person," "car"). Downloads with a single line, usable immediately.
- ByteTrack -> the "memory." On its own, YOLO sees every frame from scratch. ByteTrack links objects between frames and assigns them numbers (IDs), so it understands: this person at second 1 and at second 5 is the same one. Without this you can't count or measure movement.
- Supervision -> the "construction kit." A library of ready-made blocks: draw boxes, add a counting line, define a zone, count crossings. It turns "the model sees objects" into "the program counts entries and exits."
- Roboflow -> the "almost no-code platform." In the browser: you label your data with the mouse, train a model in a couple of clicks, and get a ready API. And in the Roboflow Universe section there are thousands of already-trained models -> often you don't have to train anything at all, just grab a ready one.
- Google Colab -> the "computer in your browser." A free environment where code runs on Google's servers. You don't need a powerful PC and you don't install anything: open the page, paste the code, hit the button.
- AI assistant (Claude, ChatGPT, Gemini) -> "your programmer." Writes code for your task, changes it, and fixes errors. For those who want to build a real app, there's Cursor -> an editor where the AI writes almost all the code itself.
How it works together (the pipeline):
Video → YOLO finds the objects → ByteTrack gives them numbers → Supervision counts by line/zone → you get the result (annotated video + numbers). All of this runs in Colab, and the code is written and fixed by AI. If you need non-standard objects, you train a model in Roboflow.
Part 3. How to work with AI -> your main skill
In this setup your real skill isn't Python -> it's the ability to clearly explain the task to the AI and put the pieces together. It's like working with a very capable assistant: the clearer the task, the better the result.
The golden rule: any error Colab throws, you copy in full and hand to the AI -> it will fix the code for the current version of the library. Versions change, code sometimes breaks -> that's normal, that's what the AI is for. Never sit there struggling with an error yourself.
Prompt templates that cover 90% of tasks:
Adapt a script for yourself:"Here's a working Python script using the supervision library [paste the code]. I'm not a programmer. Change it so it counts only people, not all objects. Return the full, complete code."
Fix an error:"I ran this code in Google Colab [paste the code] and got this error: [paste the entire error text]. Fix the code for the current version of the library and return the full corrected version."
Understand what the code does:"Explain in plain words, without jargon, what this script does and what I'll see as output."
Tune it to a specific video:"Help me set the coordinates of the counting line for a video 1280 wide and 720 high. The line should run horizontally through the center."
Build a new feature:"Based on this script, add counting separately by type: how many cars and how many trucks passed. Return the full code."
Write text (resume, README, client proposal):"Write a short English description of a visitor-counting project for my GitHub: the problem, the solution, which technologies, how to run it."
Common beginner mistakes when working with AI:
- Giving the AI a snippet instead of the whole code -> so it fixes it blind. Give the entire script.
- Writing "it doesn't work" instead of the error text. Always paste the full error.
- Editing the code by hand at random. Don't ask the AI to make the change and return the finished version.
And most importantly ->** always check the result.** The AI can confidently produce code that runs but counts the wrong thing. Open the output video, eyeball it to confirm the boxes are on the right objects and the numbers look plausible. That's your responsibility, not the AI's.
Part 4. Running your first code in Google Colab -> step by step

This is the "scariest" part for a beginner, but in reality it's 5 minutes. Figure it out once.
- Open colab.research.google.com (sign in with a Google account) → click New notebook.
- You'll see an empty box -> that's a cell. This is where code goes. To the left of the cell is the ▶ button (run).
- Paste Script 0 (installing the libraries) into the first cell and hit ▶. Wait 20–60 seconds -> lines of text will scroll by, that's normal.
- Get a test video. The simplest way is the built-in sample. Create a new cell (the "+ Code" button) and run:
from supervision.assets import download_assets, VideoAssets
path = download_assets(VideoAssets.PEOPLE_WALKING)
print("Video downloaded:", path)   # this is the file people-walking.mp4
Or upload your own video:
from google.colab import files
uploaded = files.upload()   # pick a file; remember its name and put it in the script instead of input.mp4
- Paste the script you need (for example, Script 3) into a new cell. Fix the input file name if necessary. Hit ▶.
- Download the result to your computer:
from google.colab import files
files.download("output_count.mp4")
If something goes wrong:
- "No such file" / file not found -> the video name in the script doesn't match the real one. Check the file name.
- Slow and sluggish -> turn on the free GPU: menu Runtime → Change runtime type → GPU.
- Any red error -> copy it in full and hand it to the AI (the golden rule).
Part 5. The ready-to-use script kit
You don't need to understand these scripts line by line. Run it, if there's an error, hand it to the AI. Each one comes with a plain-language explanation.

Script 0 -> installation (always run this first)
!pip install ultralytics supervision -q
What it does: installs the "eye" (YOLO) and the "construction kit" (Supervision). Done once per session.
Script 1 -> find and label objects in a video
What it does: draws boxes with labels around all objects. This is the basic check that everything works.
from ultralytics import YOLO
import supervision as sv

model = YOLO("yolov8n.pt")          # the "eye" model, downloads automatically
box_annotator = sv.BoxAnnotator()
label_annotator = sv.LabelAnnotator()

def callback(frame, index):
    results = model(frame)[0]
    detections = sv.Detections.from_ultralytics(results)
    labels = [f"{results.names[c]} {conf:.2f}"
              for c, conf in zip(detections.class_id, detections.confidence)]
    out = box_annotator.annotate(frame.copy(), detections=detections)
    out = label_annotator.annotate(out, detections=detections, labels=labels)
    return out

sv.process_video(source_path="input.mp4", target_path="output_detect.mp4", callback=callback)
print("Done: output_detect.mp4")
Script 2 -> tracking with numbers (IDs)
What it does: assigns each object a persistent number and keeps it while the object is in frame. The basis for counting and movement.
from ultralytics import YOLO
import supervision as sv

model = YOLO("yolov8n.pt")
tracker = sv.ByteTrack()
box_annotator = sv.BoxAnnotator()
label_annotator = sv.LabelAnnotator()

def callback(frame, index):
    results = model(frame)[0]
    detections = sv.Detections.from_ultralytics(results)
    detections = tracker.update_with_detections(detections)
    labels = [f"#{tid}" for tid in detections.tracker_id]
    out = box_annotator.annotate(frame.copy(), detections=detections)
    out = label_annotator.annotate(out, detections=detections, labels=labels)
    return out

sv.process_video(source_path="input.mp4", target_path="output_track.mp4", callback=callback)
print("Done: output_track.mp4")
Script 3 -> counting line crossings (the main, commercial one)
What it does: counts how many objects crossed an imaginary line in each direction. This is exactly "how many visitors came in" or "how many cars drove by."
from ultralytics import YOLO
import supervision as sv

model = YOLO("yolov8n.pt")
tracker = sv.ByteTrack()

# Counting line: tune the coordinates (x, y in pixels) to your video.
line_zone = sv.LineZone(start=sv.Point(x=0, y=400), end=sv.Point(x=1280, y=400))

box_annotator = sv.BoxAnnotator()
label_annotator = sv.LabelAnnotator()
line_annotator = sv.LineZoneAnnotator()

def callback(frame, index):
    results = model(frame)[0]
    detections = sv.Detections.from_ultralytics(results)

    # TO COUNT ONLY PEOPLE — remove the # on the line below (0 = person):
    # detections = detections[detections.class_id == 0]

    detections = tracker.update_with_detections(detections)
    line_zone.trigger(detections)
    labels = [f"#{tid}" for tid in detections.tracker_id]
    out = box_annotator.annotate(frame.copy(), detections=detections)
    out = label_annotator.annotate(out, detections=detections, labels=labels)
    out = line_annotator.annotate(out, line_counter=line_zone)
    return out

sv.process_video(source_path="input.mp4", target_path="output_count.mp4", callback=callback)
print(f"In: {line_zone.in_count} | Out: {line_zone.out_count}")
Save the count to a file (you can hand it to the client)
Add this at the very end, after the video is processed:
with open("counts.txt", "w") as f:
    f.write(f"In: {line_zone.in_count}\n")
    f.write(f"Out: {line_zone.out_count}\n")
print("Numbers saved to counts.txt")
Anything harder -> hand it to the AI (don't write it yourself)
- **Vehicle speed estimation: **"Based on YOLO and the supervision library, write a script for Google Colab that estimates the speed of cars in dashcam/road-camera video. Explain in plain words, in detail, how to set up the perspective for my frame. I'm not a programmer, give me the full, ready code."
- Counting inside an area (instead of by a line) -> for example, how many people are in a waiting zone: "Rework the script so it counts the number of people inside a rectangular zone in the video (use PolygonZone from supervision). Give the full code and explain how to set the zone coordinates."
- Custom objects (products, defects, animals not in the standard model): label a dataset in Roboflow through the browser, train it there, get your model and ask the AI to plug it into Script 3.
Part 6. Portfolio -> three projects that sell
A portfolio matters more than a degree: on the international market they look at the result you've shown, not at credentials. You need 3 short demos for real niches.
Where to get free videos for demos (no copyright headaches):
- The built-in Supervision sample (see Part 4) -> the fastest start.
- Pexels and Pixabay -> free stock videos of people, streets, cars, licensed for use.
The three projects:
- Visitor counting for a store. Script 3 with a people-only filter, line at the entrance. You show: the video with boxes and a counter + the final numbers. Who it sells to: retail, cafés, malls.
- Counting and tracking cars. Script 3 on road/parking footage. Who it sells to: parking operators, road services, traffic analytics.
- A custom object via Roboflow. You label something non-standard (e.g., bottles on a line, or defects) and count it. Shows you can work with the client's data. Who it sells to: manufacturing, warehouses, agriculture.

How to package each project:
- Record a demo video of the result (10–30 seconds). Screen-record the output video playing -> any screen recorder works, or just upload a short clip to YouTube as "unlisted."
- Put it on GitHub (a free site for code and projects). Let the AI write the files and the description text (README): "Write a README in English for a visitor-counting-on-video project. Split it into: the problem, what the solution does, which technologies (YOLO, ByteTrack, Supervision), how to run it in Google Colab. Short and clear."
- Optional ->** a live demo.** You can deploy it for free on Hugging Face Spaces (a platform where your demo runs online and can be opened by a link) or via Roboflow's ready API. This greatly increases the client's trust. How to do it -> ask the AI.
Part 7. Where to find clients and how much to charge
Clients from the US/Europe pay in dollars. The main platform to start on is Upwork.
Step 1. Your Upwork profile

The headline should be a narrow specialty, not "AI developer in general." Example (you can use it as is):
Computer Vision Engineer ->** Object Detection, Tracking & People/Vehicle Counting**
The "Overview" text -> an English example:
I build computer vision systems that detect, track, and count objects in video -> people counting for retail, vehicle counting for traffic and parking, and custom object detection for manufacturing and inventory.Stack: YOLO, ByteTrack, Supervision, Roboflow, Python. I deliver working solutions with annotated output video and exportable counts (CSV/report).See my demos below. Tell me your use case and I'll show you exactly what's possible.
In the profile's portfolio -> your three demos with videos and links to GitHub.
Step 2. Your first reviews
This decides everything at the start. Take your first 3–5 jobs at a slightly below-market rate (for example, $30–45/hr instead of $60+) to quickly get reviews and a rating. Then raise your rate right away -> sitting on a low rate after good reviews means leaving money on the table.
Step 3. Responding to a job (proposal)
Don't write a wall of text. Structure: "I understand the task → I've built exactly this → how and for how much I'll do it." English example:
Hi! You need to count [people/vehicles] in your video footage -> I've built exactly this. Here's a 20-second demo of my counting system: [link].For your project I'll: detect and track the objects, set up a counting line/zone, and give you the annotated video plus the final counts in a report.I can deliver a first working version in [3–5] days. Happy to do a quick test on a short clip of your footage first, free of charge.
A free test on the client's short clip removes half the doubt and often seals the deal.
Step 4. What to ask the client up front (so you don't get it wrong)
- What exactly are we counting/detecting (people, cars, a specific product)?
- Where does the video come from: a ready file, a camera, an online stream (RTSP)?
- What's needed as output: annotated video, numbers in a table, a live dashboard, alerts?
- What accuracy is good enough, and what's the deadline?
- What's the budget?
Step 5. Prices and fees
- Hourly: start at $30–45 (for reviews) → then confidently move toward the market: junior $50–80, middle $80–120, senior $120–200+. The median ML freelance rate is ~$100/hr.
- Per project (fixed): a simple turnkey counting system, a starting benchmark of $300–1500; serious systems run from $5k and much higher (on the market, projects reach $250k+).
- Upwork fee -> variable 0–15%, usually ~10% (on a $50 rate you net ~$45). Build this into your price.
Step 6. Where to grow
- Toptal -> a platform with a top-3% screening, higher rates and more solid clients. Go there once you already have a portfolio and reviews.
- Fiverr -> you can set up a "productized service" (e.g., "I'll set up people counting on your video for $X") and get jobs more passively.
Part 8. Your first 90 days plan
| Period | What you do | Result |
|---|---|---|
| Week 1 | Figured out Colab, ran Scripts 1–3 on a test video | Code works in your hands |
| Weeks 2–3 | Built 3 niche demos on your own videos, recorded clips | Ready demos |
| Week 4 | GitHub + English packaging (text from AI) | Portfolio online |
| Week 5 | Upwork profile, first proposals | First proposals sent |
| Weeks 6–10 | Active proposals (10–20/week), free tests for clients | First job and review |
| Weeks 11–13 | Deliver the work, collect reviews, raise your rate | First money, rate increase |
Don't get discouraged if the first job doesn't come right away -> at the start that's normal; the path often takes 1–3 months of active effort.
Part 9. Money benchmarks (USD, 2026)
| Channel | Junior | Middle | Senior |
|---|---|---|---|
| Freelance ($/hr) | $50–80 | $80–120 | $120–200+ |
| Turnkey project | from ~$10k | — | up to $250k+ |
| Full-time job in the US ($/yr) | ~$102k | ~$130–165k | $200k–266k+ |
The computer vision market is growing: roughly $22 billion in 2024 → a forecast of ~$111 billion by 2033. Demand is on your side.
Part 10. Frequently asked questions (FAQ)
Do I need a powerful computer? No. Google Colab gives you free access to powerful servers with a GPU in the cloud. You can work from even a weak laptop or a tablet.
Do I have to pay for anything? Basically everything is free: Colab (free tier), YOLO/Supervision (open source), Roboflow (free plan), GitHub. You start paying only when projects grow (paid Colab/cloud).
Is this legal? The tools themselves -> yes, they're open and legal. But when you work with real cameras and people, there are privacy and data laws. Don't publish other people's footage without permission, and discuss with the client that they have the right to that data.
What if the client's task isn't like the scripts? That's what the AI is for: break the task into parts and ask for help. If the task is genuinely beyond what you can do, it's better to honestly decline than to blow the deadline.
How fast will the first money come? Realistically -> from a few weeks to a couple of months with active effort. This isn't a "money button," it's a skill you have to sell.
Do I need math and theory? For this AI-assisted path -> no. Understanding the basics will help later, when you want to take on complex projects or go into full-time work.
Will it work in real time / with a live camera? Free Colab is enough for demos and processing files. For an online stream (RTSP) and real time you need more resources -> the AI will tell you how to set it up.
Part 11. What NOT to do
- Don't go to market without being able to "deliver a result." "It ran on my machine" isn't enough -> the client needs a clear outcome (video + numbers + a short report).
- Don't clone pure tutorials one-to-one. You need demos on your own videos and for a specific niche.
- Don't get stuck on a low rate. Raise it after your first reviews.
- Don't trust the AI's code blindly. Always open the result and check by eye that it counts correctly.
- Don't spread yourself thin over "AI in general." A narrow specialty (counting/tracking/video analytics) sells for more and is easier to understand.
Part 12. Glossary
- Model -> a trained program that recognizes something (e.g., YOLO recognizes objects).
- Dataset -> a set of images/videos the model learns from.
- Labeling / annotation -> when you outline the needed objects in images with the mouse so the model understands what to look for (done in Roboflow).
- Bounding box -> the rectangular box around a detected object.
- Class -> the type of object: "person," "car," "bottle."
- Confidence -> how sure the model is about a detection (from 0 to 1).
- Inference -> the moment the model runs and recognizes something (as opposed to training).
- Training -> the process where the model learns from a dataset for your task.
- Tracking / ID -> following a single object across frames with a persistent number.
- API -> a way to reach the model "over the internet": send an image, get a result, without your own model code.
- FPS -> frames per second; the higher, the more "real-time" the video processing.
- RTSP -> the format of a live stream from a surveillance camera.
- GPU -> a powerful processor for graphics cards; it speeds up models (in Colab it's free in the cloud).